Inexpensive, do it yourself permenant aquascaping

Got any home remedies or DIY projects? Share them here!
Problems with your tank's equipment? We can help!
BiG MoMMa PuFF
Puffer Fry
Posts: 3
Joined: Wed Sep 14, 2005 6:18 pm

Inexpensive, do it yourself permenant aquascaping

Post by BiG MoMMa PuFF »

Check this site out, it's pretty neat, I'll be doing this with my tank.

http://www.cichlid-forum.com/articles/d ... round3.php

http://www.cichlid-forum.com/articles/diy_list.php


enjoy! :D
Feathers&Fins
Figure 8 Puffer
Posts: 201
Joined: Sat Jun 04, 2005 5:42 pm
Gender: Female
My Puffers: Pufferless since Nova passed; had 2 red T.miuris, 4 T.biocellatus for many years.
Location (country): KY (USA)
Location: (US) Kentucky

Post by Feathers&Fins »

I've used the white styrofoam and it was very aggrevating to work with. I do not exaggerate when I say I found styrofoam beads everywhere… everywhere! It's difficult to clean up and get off of your skin due to static electricity. Extruded polystyrene insulation is much easier to cut and clean up. You can also use "Great Stuff" construction foam.

HTH
User avatar
SRC
Puffer Fry
Posts: 15
Joined: Tue Jun 12, 2007 11:43 am
Location: Smokerise, AL USA
Contact:

Post by SRC »

I know this is an old thread, but I'm in the middle of making another foam background for someone and thought I'd throw this out for you (since I saw it).

Instead of using regular Styrofoam from the craft isle, walk a few isles over to the floral isle. Grab some floral foam. It's very smooth and almost carves itself. You'll be amazed how easy it is. I use a flat head screwdriver to carve with, if that tells you anything. It scrapes easily away with minimal effort. Regular Styrofoam .. you gotta put some muscle to it.

Image

It makes a fine dust though, so you need to wear goggles and one of those white masks. You can get a pack for cheap on the home & garden isle. You don't wanna breathe this stuff, or get it in your eyes. I've gotten it in my eyes .. it's not nice.

You also don't have to use quickrete to coat it and make it look like rocks either. Simply paint the piece you've carved some basic color I usually do it a light brown). Let it dry. Then you can do it one of 2 ways.

Materials needed:
Acrylic Craft Paint (you decide the colors based on what color you want your rocks)
Colored Sand (again, up to you on the color. Can be bought at most Hobby Lobby's for $1.99 for a 1 1/2 lb jar).
Clear Polyurethane, waterproof variety (can get at most Lowe's)

Way 1. After coat 1 dries paint rocks the color you want. Sprinkle with light colored sand as you go. Let this dry completely. Apply 2 coats of Polyurethane, let dry completely between coats. Then let it cure for 2 weeks. Letting it dry outside (where there is heat, but no moisture) works best. (this makes sure there are no chemicals left. They will evaporate).

Way 2. Paint your rocks whatever color you want. Apply a coat of Polyurethane, let it dry completely. Apply your second coat and sprinkle with whatever color(s) of sand you want your rocks to be. Let the piece)s) cure for 2 weeks.

Way 1 will give you smoother rocks, Way 2 will give you textured rocks. You can also add way more detail with Way 1 than Way 2. I prefer Way 1 myself.

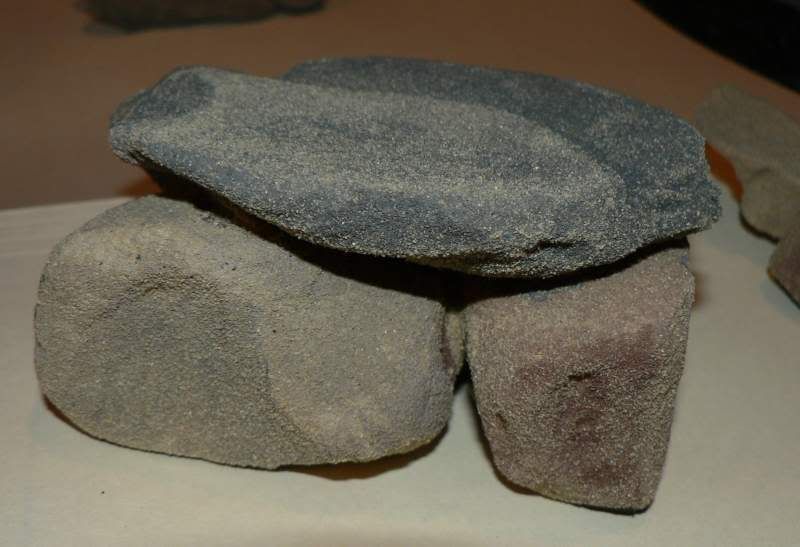
Here are some examples from last night (they do not have Polyurethane on them yet though. As they aren't completely dry .. plus my Polyurethane hasn't come in yet lol.)
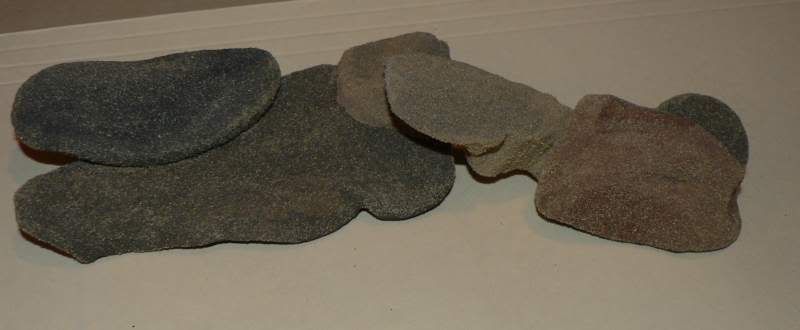
Image

Image

They will look rather shiny after you put the poly on .. but once it's in the water .. you can barely tell. Once they've been in the tank about a month .. they look completely real.

Here are some that were done in Way 2. (it's not all of the same piece .. these are just to show the steps)

foam block
Image

carved
Image

painted
Image

1 coat of poly
Image

sanded (I did several layers , this was layer 1)
Image

sanded (layer 2)
Image

You will have to use either epoxy or silicone to attach it to your tank if you aren't using the quickrete though. I like this way better because it doesn't add so much weight sitting on the floor of your tank. I also like it because concrete will sometimes raise your PH, which is great if you have cichilds, but not so great for other fish.
~Jennie~
User avatar
PuffTheMagicFishy
Figure 8 Puffer
Posts: 166
Joined: Sat Jul 22, 2006 12:51 am
My Puffers: None at the mo.
Location (country): California, USA
Location: California

Post by PuffTheMagicFishy »

Awesome sculptures there! You are quite the artist and I bet your fish love you for it. Could you post more pictures once the items are in the tank? :)

Do you have trouble with the finished items being too soft and easily damaged during tank maintenance?

Also, what do you use to glue multiple pieces together?
Tanks:
20-gal feeder breeder (platties and snails)
75-gal West African Lungfish + snails

Other pets: Pacific parrotlet, Italian Greyhound, lots of plants
User avatar
manutius
Former Staff Member
Posts: 1316
Joined: Mon Dec 11, 2006 3:49 pm
My Puffers: RIP Clooney the Mbu :(
Location: Southend essex, UK
Contact:

Post by manutius »

wow this is great, I saw a this idea using styrofoam on a blog on the PFK website but he made a rock wall.

I too would love to see more pics of them in the tank too if you could be so kind :D
kass
Green Spotted Puffer
Posts: 473
Joined: Fri Jan 06, 2006 5:14 pm
Gender: Male
Location (country): Canada
Location: Guelph, Canada

Post by kass »

That is awsome! Great work.
User avatar
SRC
Puffer Fry
Posts: 15
Joined: Tue Jun 12, 2007 11:43 am
Location: Smokerise, AL USA
Contact:

Post by SRC »

Thank you :) and I certainly can.

Right now all I have pics in a tank are caves. The other background I made I made for someone else and I didn't put it in a tank and take pics before I shipped it off (didn't have a functioning digi cam at the time, I have this great ability to drop them while the lens is extended ... FTR, cameras really don't like that at all lol :( ).

This is a cave in my betta Moo's 2.5 gallon tank. I used the filter foam (used to slow the flow down so it didn't blow her around) to hold it in place instead of anchoring it to the tank itself. I swap my bettas around often, so I just use something to hold them down usually.

Image

Image

Image


I willl post pics of the one I am making right now as soon as I get my poly in and get it coated, but it will probably be next month. I have to get the poly in, get the pieces coated, and let them cure before I can add it to the tank. I've been taking pics through the entire process though, so I'll post them all at once.

I haven't ever glued any finished pieces together, if I need to glue anything I usually do it before I seal it. I use epoxy (the kind that comes in the little 2 part syringe looking contraption) to glue the foam together .. like the pic above .. when I need a thicker piece of foam.

As for it being fragile .. yes and no.
The sand makes it harder than it is without it .. but you don't wanna go throwing it around either. I have dropped the caves on the floor and it didn't do anything to it. Right now I am making a background with a rock wall and some mangrove roots. I wouldn't recommend banging the roots around, since they are rather thin pieces. If you have a thick piece (like the group of rocks pictures above) I wouldn't really worry about it. The small rock piece .. I wouldn't pick it up by the small end and wave it around lol, ya know.

IMO they are no more delicate that silk plants (how if you waggle them around they will come loose from the base). Just like with anything else that isn't solid/hard .. you just have to take a little more care with them. They don't puncture easy though, you'd really have to poke it hard with something to get through 2 layers of paint, a layer of sand, and 2 layers of poly.
I had a piece I hadn't finished (didn't have sand on it, just paint and a coat of poly) was a 1 1/2" thick piece, and my dad threw a ceiling fan motor in the box I was storing it in. it barely did any damage. It hit the edge and banged it up a little, but nothing that wasn't easily fixed with some paint to touch it up and another coat of poly. :)
~Jennie~
User avatar
PuffTheMagicFishy
Figure 8 Puffer
Posts: 166
Joined: Sat Jul 22, 2006 12:51 am
My Puffers: None at the mo.
Location (country): California, USA
Location: California

Post by PuffTheMagicFishy »

Cool! Thank you for sharing your expertise. :)
Tanks:
20-gal feeder breeder (platties and snails)
75-gal West African Lungfish + snails

Other pets: Pacific parrotlet, Italian Greyhound, lots of plants
User avatar
manutius
Former Staff Member
Posts: 1316
Joined: Mon Dec 11, 2006 3:49 pm
My Puffers: RIP Clooney the Mbu :(
Location: Southend essex, UK
Contact:

Post by manutius »

That looks great, I really would like to try this one day, Hmmm Malawi tank background maybe 8)
User avatar
Myaj
Tech Team
Posts: 4587
Joined: Sat Jun 04, 2005 12:27 pm
Gender: Female
My Puffers: Bubba, turgidus
Paris, lined burrfish
Location: SE Wisconsin
Contact:

Post by Myaj »

Maybe a silly question...

If you use the quickrete AND then cover that with a layer or two of poly, will that stop it from leeching and affecting the water?

I love the look ( you are quite the artist ) but would hate to silicone anything to my tanks.
Image
User avatar
SRC
Puffer Fry
Posts: 15
Joined: Tue Jun 12, 2007 11:43 am
Location: Smokerise, AL USA
Contact:

Post by SRC »

Thanks :) .. I finally decided to go back to school so that someday I can put these skills to use. Hopefully it eventually pays off lol.

I'm almost certain you still have to secure the ones with quickrete somehow as well, they are just heavier sitting in your tanks. Styrofoam is made to float (look at boat docks that still float even though they are holding a ton of metal, wood, and people .. they usually have to sink 50 gallon drums filled with concrete and use metal rope to hold them in place).

If you use silicone .. it peels right off after you are done with it, leaving no residue (if you have a glass tank, it doesn't come off so easy on acrylic tanks .. you have to use another piece of the silicone to kinda rub the rest off .. like an eraser lol). I had a toad tank set up in my sons room and after he tired of them and I gave them away I used the filter in one of my betta tanks. I had used silicone and gravel to make the filter look like a water fall. The silicone/rock mixture peeled right off. You can't even tell it was ever there.

with rocks/silicone
Image

with rocks/silicone removed
Image

But I'm sure you could use the poly on the quickrete, just usually defeats the purpose (as poly isn't cheap and neither is the quickrete).
~Jennie~
User avatar
Agnate
Former Staff Member
Posts: 1203
Joined: Mon Dec 10, 2007 7:44 pm
My Puffers: -

1 Abei Puffer [Monotrete Abei]
(Captain Abe)
Location: Ontario, Canada
Contact:

Re: Inexpensive, do it yourself permenant aquascaping

Post by Agnate »

So I started my own aquascaped background for a second 10g I have lying around... and it's starting out "fun" already. :P

Went to use my silicone, and instead of coming out the front of the tube, it decided to eject out the rear and coat my gun with a healthy amount of silicone. Needless to say I'm taking THAT back to Home Depot. :?

*Sigh*
Did our staff successfully help you? The Puffer Forum is an incredible resource and is run completely on the donations of its viewers. Proceeds from the Puffer Forum store go towards future contests and keeping the site running. Donations may also be made via PayPal.

- Paul

40 gallon - Future home of Abei Puffer
28 gallon - 1 Abei Puffer (Captain Abe)
5 gallon - 1 Betta (Frederico)
User avatar
SpockthePuffer
Green Spotted Puffer
Posts: 334
Joined: Sun Sep 23, 2007 8:24 pm
My Puffers: A wee GSP named Milton
Location: Connecticut

Re: Inexpensive, do it yourself permenant aquascaping

Post by SpockthePuffer »

Wow this looks awesome and something that I could do very easily, I'm a big fan of textures and I'm an artist! It will be a good excuse to use my artistic skills to improve our tanks! lol!

This makes me very excited to try out!!!
"How inappropriate to call this planet Earth, when clearly it is Ocean." - Arthur C. Clarke

~Shannon~
10g betta & snail tank, 30g GSP named Milton, 55g sw fowlr
inkmates
Puffer Fry
Posts: 14
Joined: Mon Jun 30, 2008 6:40 pm
My Puffers: Webbed burrfish
Location: Lockport Ny

Re: Inexpensive, do it yourself permenant aquascaping

Post by inkmates »

Has anyone tried this in a marine tank? Just wondering how it would hold up to the saltwater?
User avatar
The Bruce
Figure 8 Puffer
Posts: 193
Joined: Sat Jun 04, 2005 3:58 am
My Puffers: 2xFahaka
3xDwarf
1xMbu
1xHumpback
1xDogface
1xMuirus
1xRedeye
Location: Sacramento, CA

Re: Inexpensive, do it yourself permenant aquascaping

Post by The Bruce »

I wouldn't use this in marine tanks, i don't know about how it would stand up, but the price for live rock is nothing compared to what it does for your water quality.
Post Reply